Install, sync, clean up, hand off. Panes and buttons as they are in the shipping app.
Install and first run
macOS 14 (Sonoma) or later, Apple silicon (M1 or later). Intel Macs are not supported.
A folder of media you can read.
Premiere Pro or DaVinci Resolve, only if you want the one-button handoff. Neither is required to sync.
1Drag PrePost Sync from the .dmg into Applications.
2Open it. First launch is slower while macOS checks the signature.
3The trial runs three days, fully unlocked — no watermark, no clip limit, no disabled export.
"Developer cannot be verified" — right-click the app in Applications and choose Open. Once, on first launch.
Licence and activation
1Copy the key from your purchase email.
2Open the licence panel from the app menu and paste it in.
3Activation is immediate and the trial countdown disappears.
A lifetime licence is one purchase. It does not expire.
The app checks in occasionally, so it needs a network connection now and then — not every launch.
To move machines: deactivate on the old one, enter the same key on the new one. If the old machine is gone, use the licence lookup on this site and we will release the seat.
Your first sync
Point it at the source folder as it came off the cards. Press Synchronize. One pass.
1Press Import.
2Tick the folder your shoot lives in. You can tick more than one.
3Press Detect Cards. Sync reads the folder tree and shows what it found before importing. Or press Import Without Detecting to bring the files in flat.
4Media lands in bins mirroring your folders. Each card gets its own track.
5Press Synchronize.
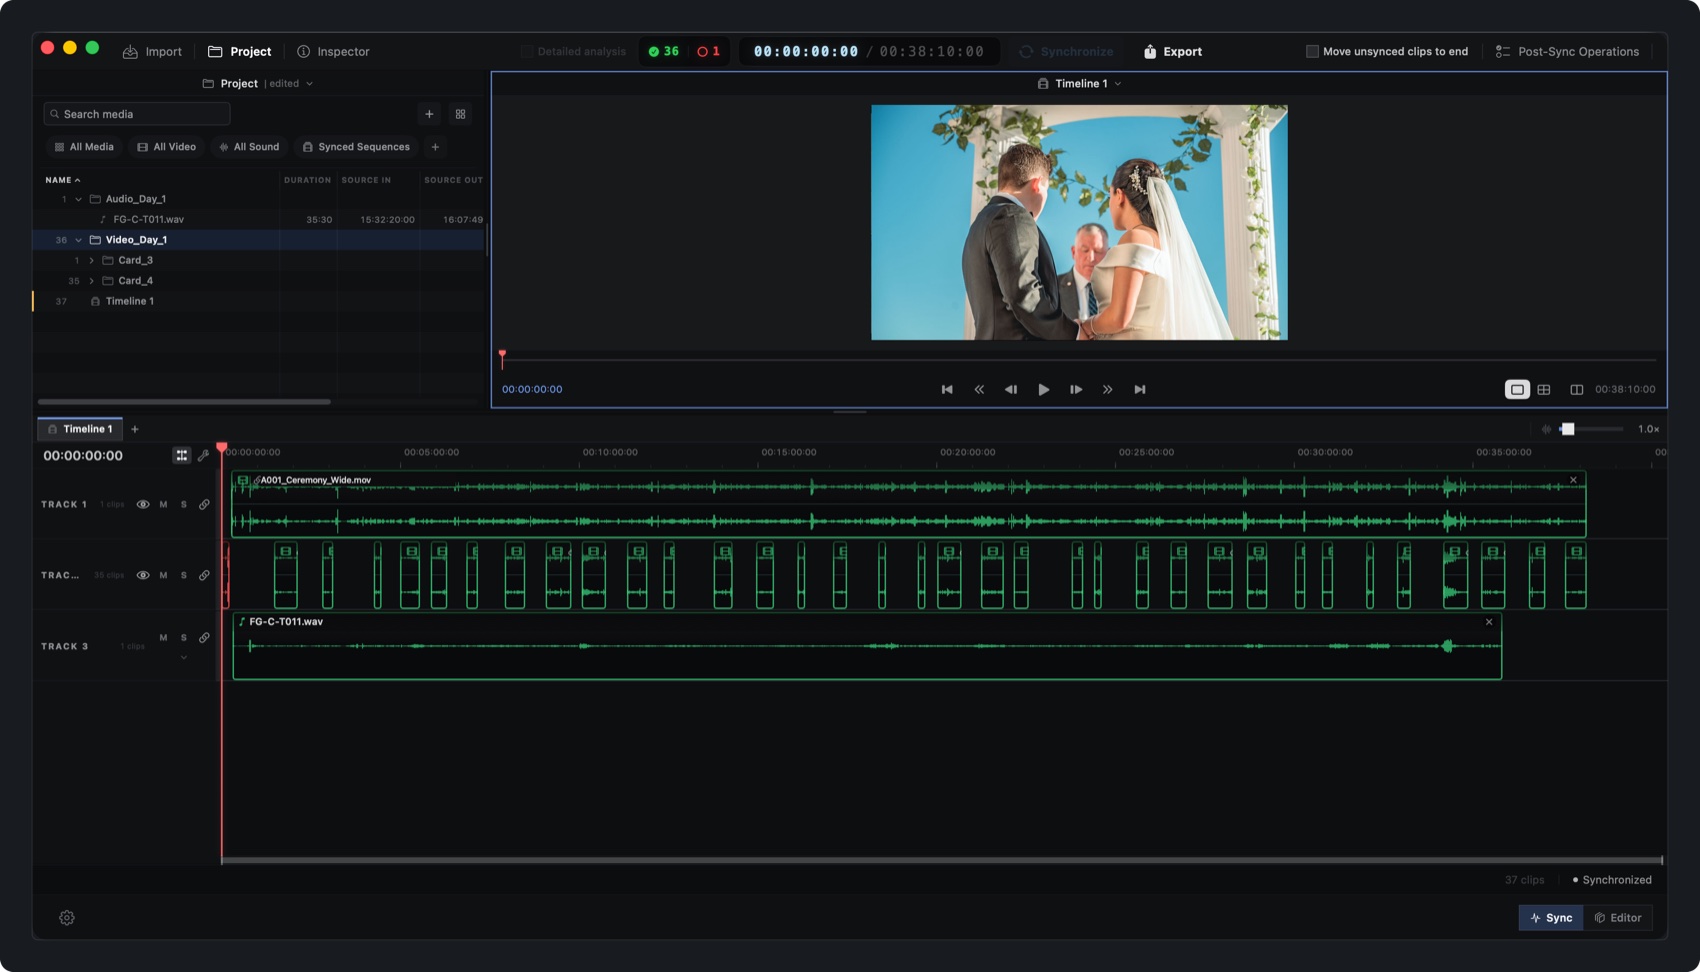
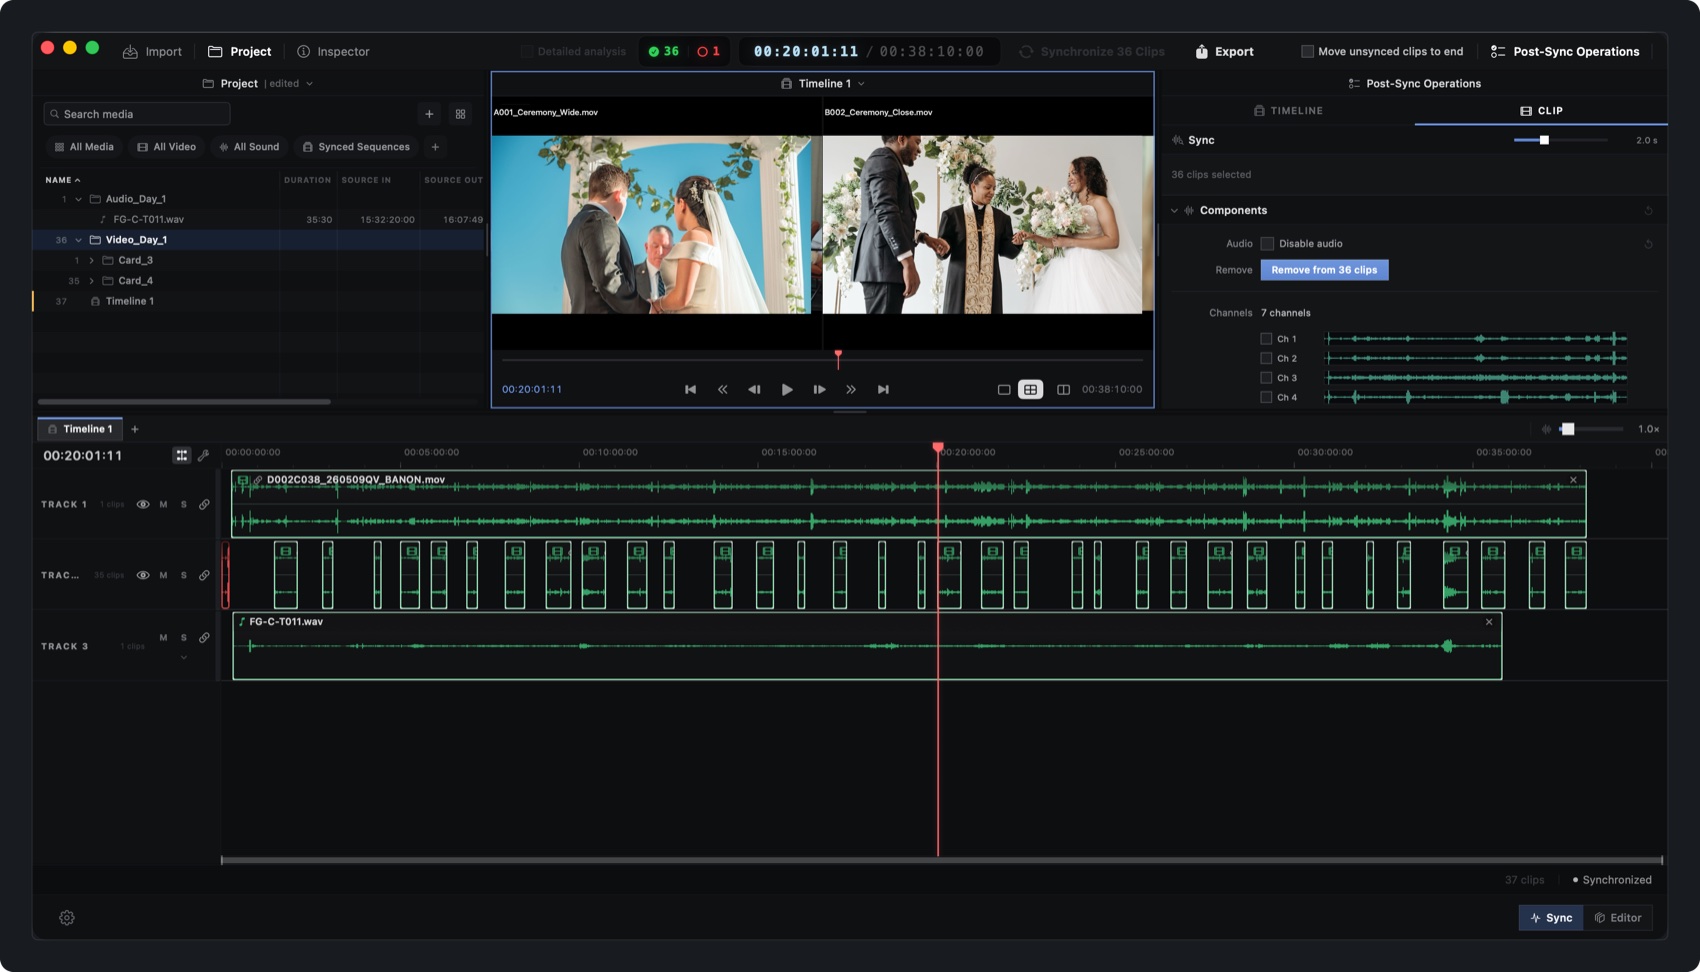
Header counters report what synced. Placed clips turn green.
When the pass finishes the footer reads Synchronized and Post-Sync Operations lights up in the header.
Video formats
MOV, MP4, MXF, AVI, MKV, M4V, WebM, WMV.
Audio formats
WAV and BWF, AIFF, CAF, MP3, M4A, AAC, FLAC, OGG — including multi-channel recorder files.
Sync matches on sound, not timecode. Cameras that were never jam-synced and recorders on their own clock both work. Camera scratch audio only has to be recognizable, not good.
Multi-channel audio and drift
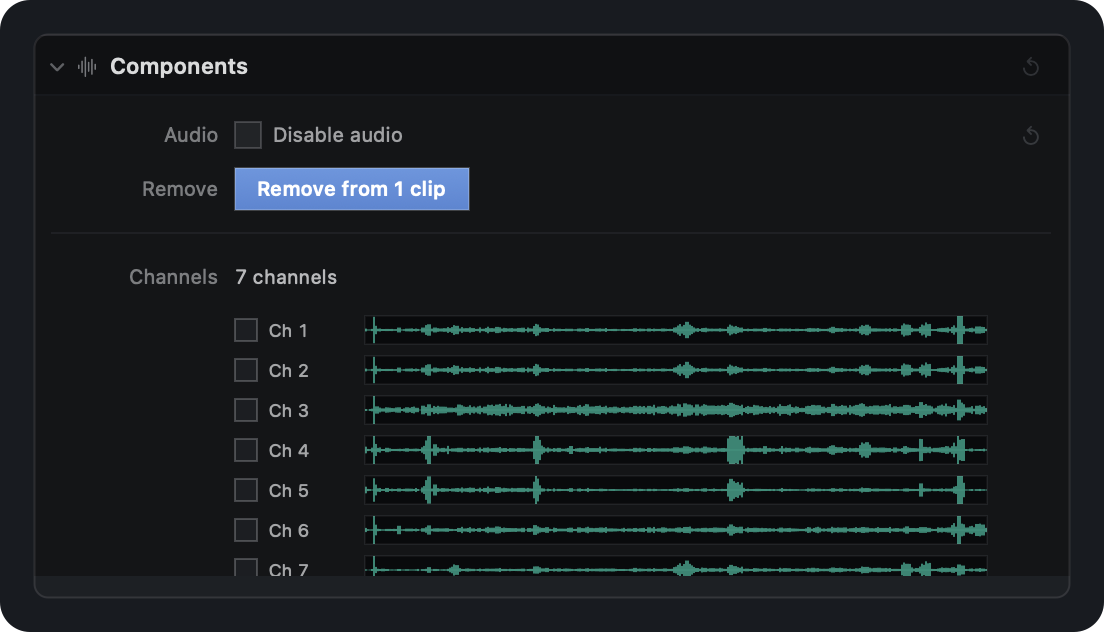
Channels stay apart. An 8-channel WAV lands across A1–A8; an MXF with four discrete mono streams stays four lanes.
The CLIP tab lists every channel a source carries, each with its own tick box.
Select a clip and the CLIP tab lists its channels. Tick the ones you do not want and they come off the timeline. Select several clips from the same recorder and one tick applies to all of them.
Drift, measured
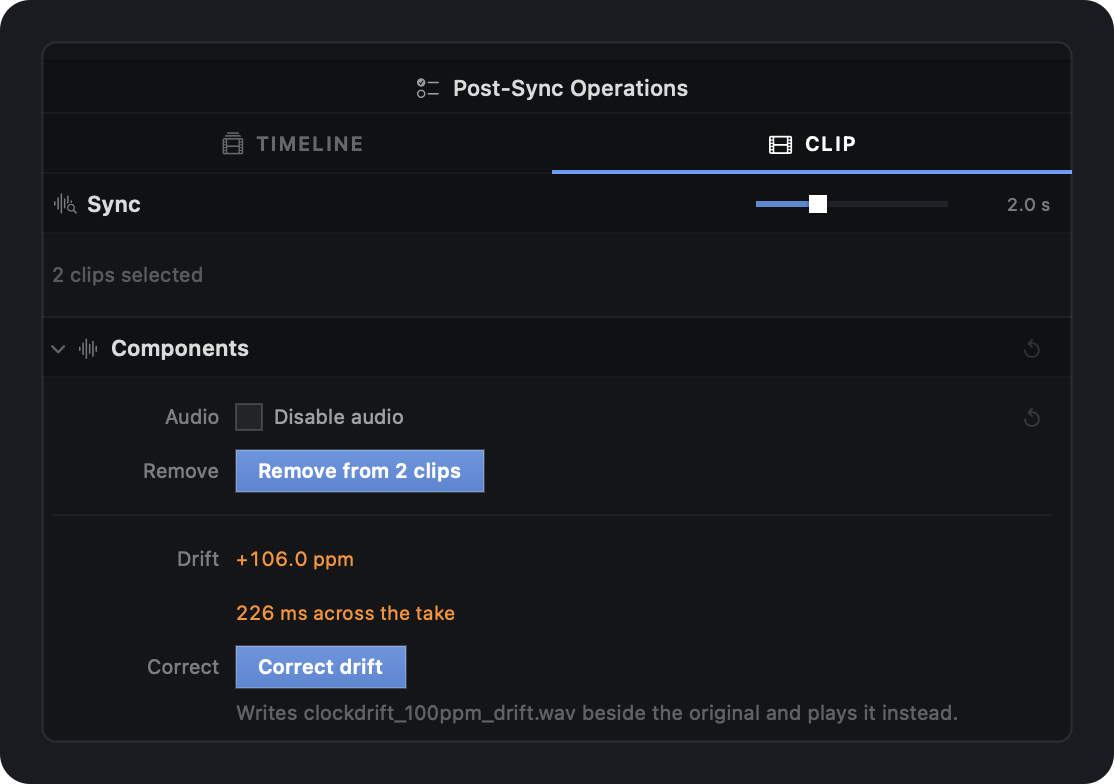
Two devices rarely share a clock, and the ones that do not diverge steadily — the head syncs, the tail walks away. Sync reports the rate error in ppm, with what it costs in milliseconds and frames across the take.
Drift, corrected
Correct drift resamples the audio to match the camera clock, writes a corrected copy beside the original and plays that. The original is never modified; the reset arrow points the clip back at it.
A recorder running 106 ppm fast: 226 ms adrift by the end of the take.
Nothing is corrected automatically — correction writes a file, so the button is yours to press. Needs uncompressed source: WAV, BWF, AIFF or CAF. When it cannot run the button stays visible and greyed, with the reason underneath.
Reviewing the result
The Sync and Editor buttons in the bottom-right corner switch how the timeline is drawn. View only — the offsets never move.
Sync view
One row per track, clips at their real offsets. For checking the pass did what you expected.
Editor view
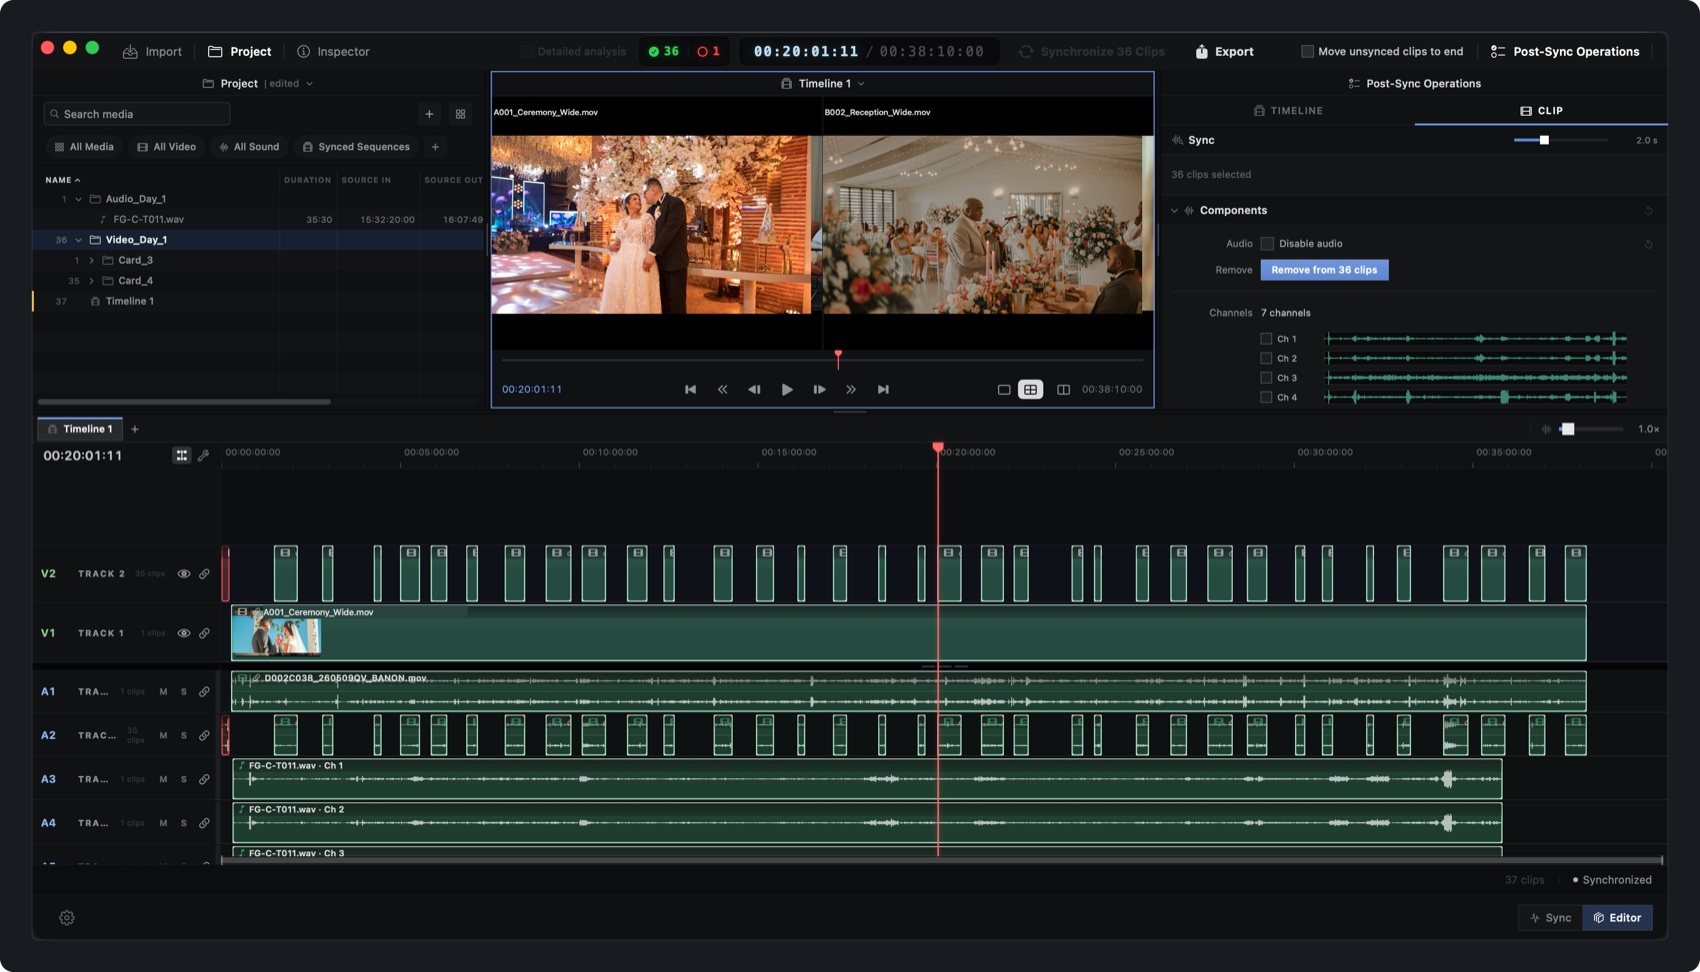
V1, V2, V3 above the divider, A1, A2, A3 below — the timeline as your NLE will show it, multichannel audio already broken out.
Editor view: each recorder channel gets its own lane, named and numbered.
The preview above the timeline is a multicam grid. Scrub anywhere and every cell holds the playhead. Each cell is named.
Two angles of the same moment, on the same frame, before any handoff.
Post-Sync Operations
The tidy-up pass: scratch audio, labels, block spacing, unsynced takes.
Two scopes. TIMELINE acts on everything; CLIP acts on your selection. Every section has a reset arrow that undoes its own change.
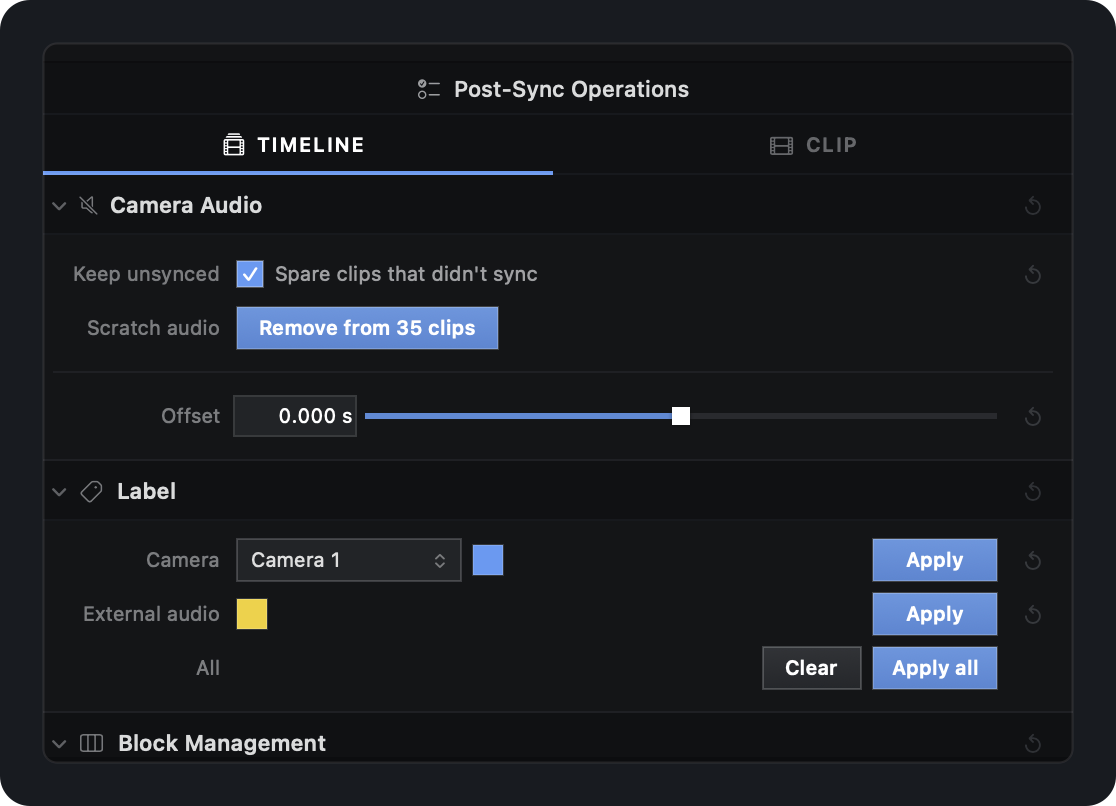
TIMELINE scope. Each section states what it does and how many clips it touches.
Camera Audio
Strips camera scratch audio once the real sound is synced against it. The clip count is on the button. Spare clips that didn't sync is on by default — an unsynced clip's own audio is the only sound it has.
Offset
For a whole-timeline bias: cameras right against each other, but the block sits a few frames off the external recording. The slider moves the cameras in milliseconds. The external audio never moves.
Label
Sets the colour label on the source media, the value your NLE reads. Pick a camera and a colour, or Apply all. External audio gets its own colour.
Block Management
A synced block is rigid. The Gap slider spaces blocks apart without disturbing the sync inside them. Restore Spacing puts them back, and survives saving and reopening.
Split to timelines
Each block becomes its own timeline — all of them, or only the ones your selection touches. Selecting one angle takes its whole block; a block is never cut apart.
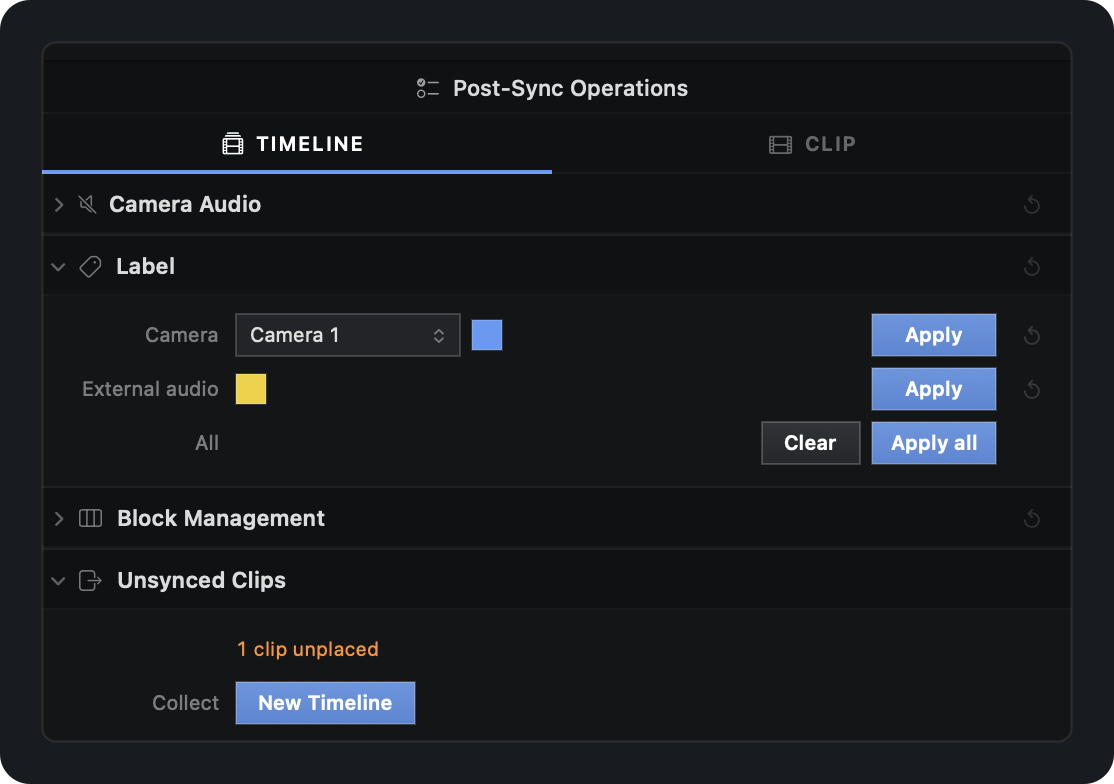
Unsynced Clips
Counted, not discarded. One button collects them onto their own timeline.
Unsynced takes are reported and collectable — never silently dropped.
Under CLIP the same gestures aim at your selection: disable a clip's audio, remove it, pick multichannel sources apart channel by channel, correct drift, or label just those clips.
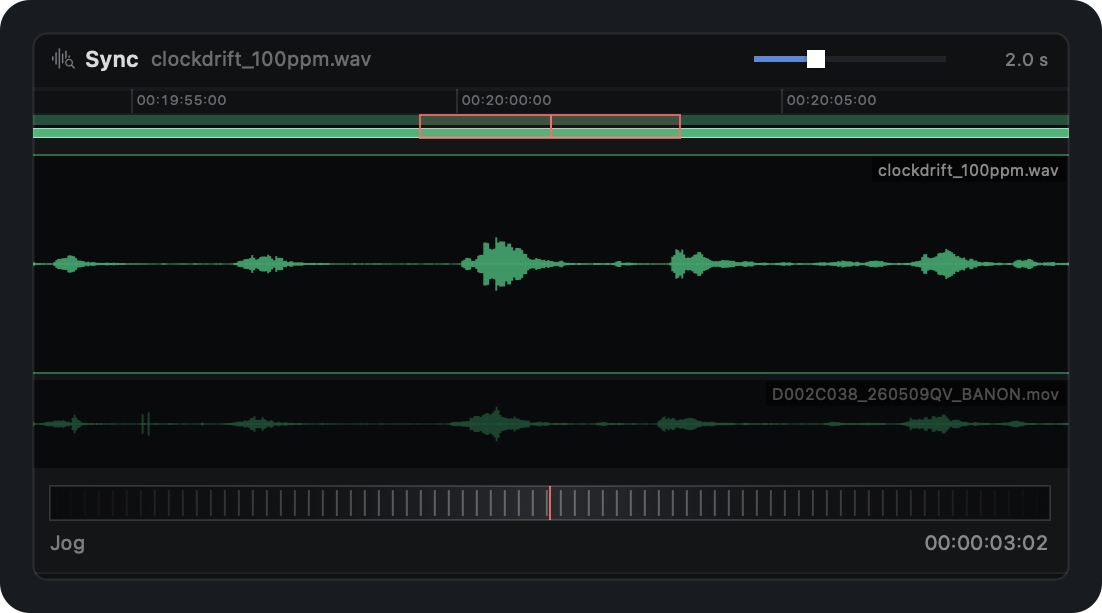
Select a single clip and the CLIP tab opens on its Sync scope: the clip's waveform stacked over the camera it matched against, with a jog wheel beneath. Drag to slide the clip against its reference and set the offset by hand, watching the peaks line up as you go.
The jog wheel, reference camera drawn underneath. The slider top-right sets the window.
No step size
Drag speed decides distance, so a nudge and a sweep are different gestures rather than different settings. It re-centres on release, because it adjusts an offset, not a position.
Sensitivity follows the zoom
One sweep covers about a third of the visible window, so zooming in makes the gesture finer. At a 50 ms window you work frame by frame; at 10 s you find the ballpark.
Timecode re-stamping
Save new copies of the audio carrying synced timecode, so any NLE can place them with no XML.
Hand a recorder's WAVs to an editor and they still carry whatever free-running clock the recorder had that morning. Premiere's Synchronize > Timecode puts them exactly as wrong as they were.
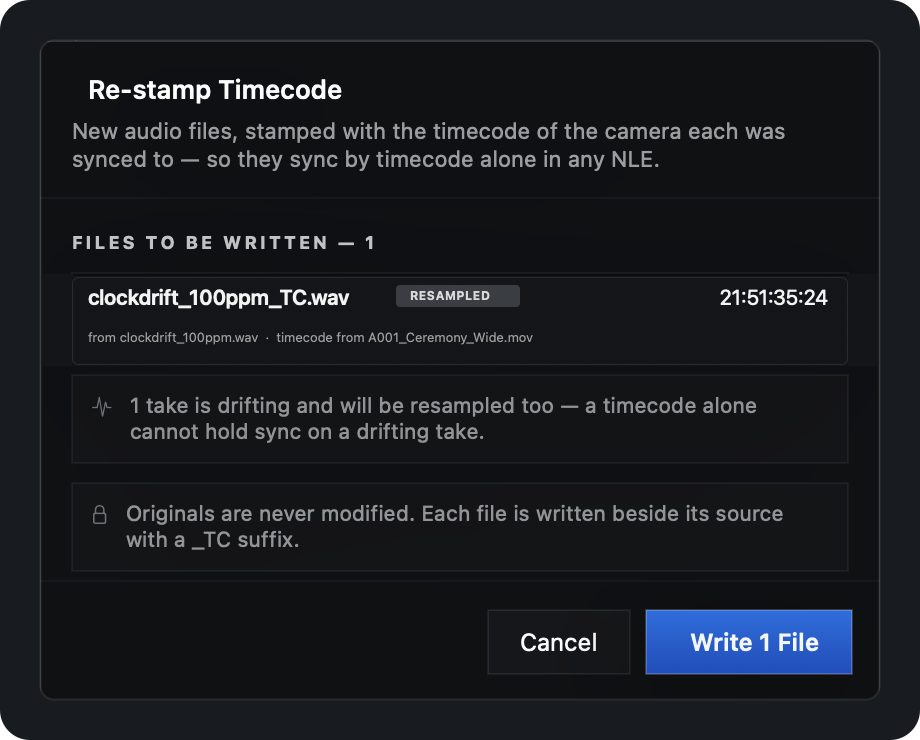
Re-stamp Timecode, in the export sheet, saves a new copy of each take carrying the matching start timecode on the camera's clock. Premiere, Resolve, Avid and Pro Tools then land it correctly with no XML, no importer and no PrePost Sync.
What it writes
A new file beside the original with _TC before the extension. Codec, bit depth, sample rate, channel count and layout are copied rather than re-encoded — with no drift to correct, the output is sample-identical. The original is never modified.
Drift, folded in
A start timecode is one number, so it expresses an offset and nothing else. When a take also has a rate error, the stamp is written onto drift-corrected audio.
Which files qualify
WAV, BWF and AIFF. Each stamped file is referenced against its own camera, not a project-wide clock, so two groups on two unsynced cameras are both correct.
The review panel lists every file it will create, its timecode and the camera that came from, before writing anything.
Needs a one-to-one pair — one audio take, one camera. When a sync group holds several cameras the sheet says so rather than guessing, because a stamped file can only match one clock.
Handoff to Premiere and Resolve
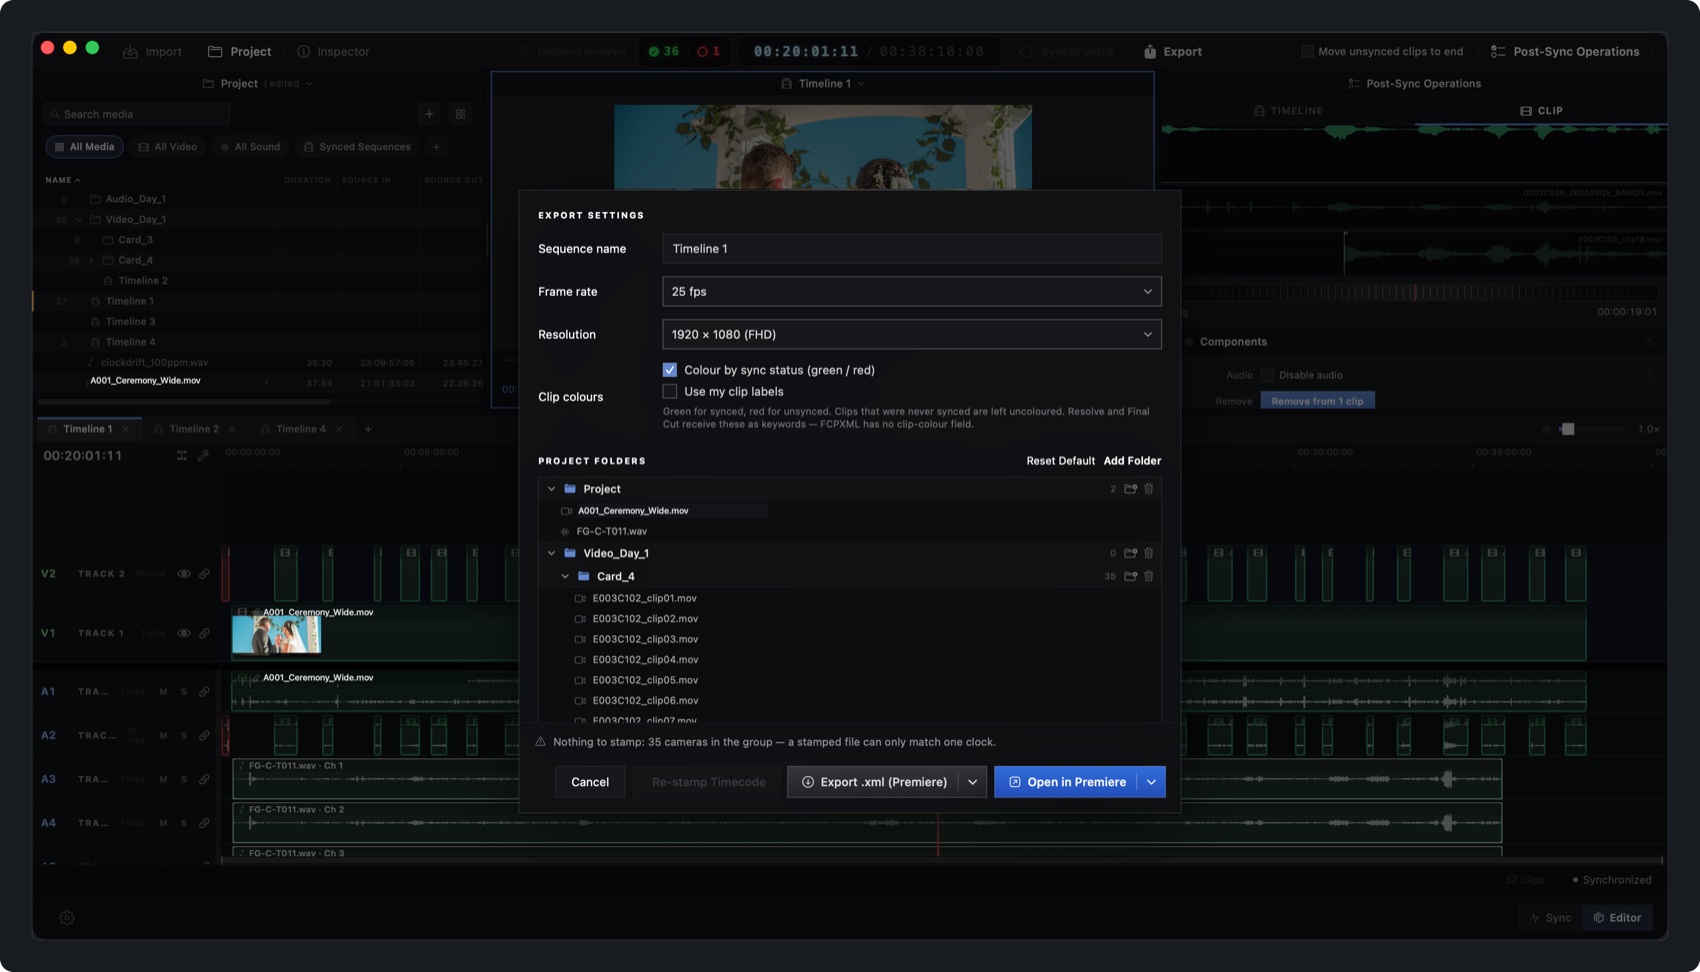
Press Export. Set sequence name, frame rate and resolution, arrange the project folders, then choose how the timeline leaves.
Sequence settings, bin structure and every way out, in one sheet.
Open in Premiere Pro
Sync writes the XML, finds your Premiere installation whichever year it is, and opens it. No save dialog, no Downloads folder, no File → Import.
Open in DaVinci Resolve
The same button, driving Resolve through its scripting API. This route carries the Media Pool bin tree and your clip colours across — no file Resolve imports can do that.
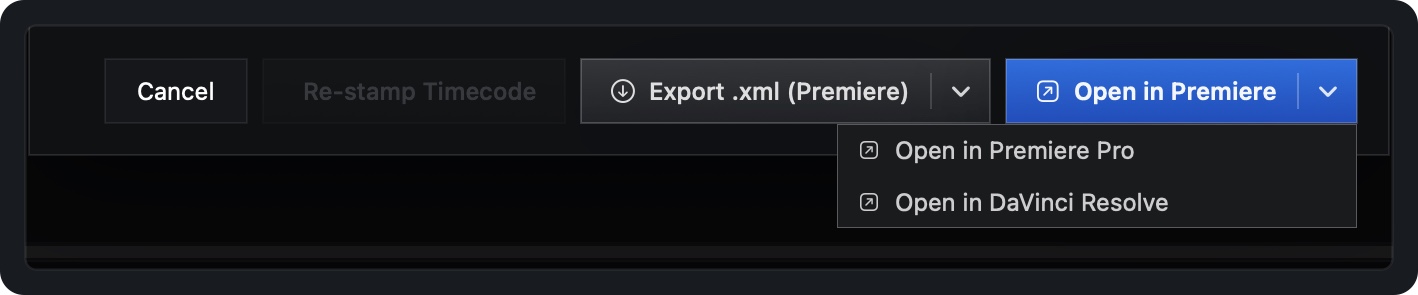
Export .xml
Two flavours, one shaped for Premiere and one for Resolve, for importing by hand or handing the file to someone else.
The menu only changes the selection. Nothing fires until you press the button.
Bins, tracks, linked media and the sync survive every route.
Clip colours come from sync status — green synced, red unsynced — or from your post-sync labels.
You can also copy clips in a Premiere project panel or sequence and paste straight into Sync. No CEP panel to install. Finder files paste the same way.
Resolve ignores clip colours in every XML it imports — a Resolve limitation, not an export bug. Open in Resolve applies them for real, because it drives the application instead of handing it a file.
The Project Folders tree in the export sheet is the bin structure your NLE receives. It starts from what card detection built; add, rename and nest as deep as you need.
Each folder carries its clips across, not just its name.
Add Folder creates a bin. Reset Default returns to the detected structure, timeline media only.
Frame rate and resolution are per export. A custom size is accepted; an incomplete one blocks the export rather than falling back to 1920×1080.
Keyboard shortcuts are editable from the app menu, in the Premiere idiom: click a binding and press the keys. Rebinding a taken key tells you what it displaced.
Troubleshooting
A card was not detected
Detection reads the folder tree, so cards copied into one flat folder leave nothing to recognize. Import with Import Without Detecting — the sync still works, only the bin structure is lost.
A take did not sync
Check the camera clip has scratch audio and the recorder was rolling. Very short takes can carry too little sound to match. Unplaced clips are counted in the post-sync pane.
Everything is a few frames out, consistently
A whole-timeline bias, usually latency in the camera audio path. Use the Offset slider under Camera Audio rather than fixing each clip.
Right at the start, drifts by the end
A clock mismatch, not a sync error. Select the clip, read the ppm figure in the CLIP tab, press Correct drift.
Premiere or Resolve did not open
Sync locates the app itself, so it is usually not installed where macOS can find it. Fall back to Export .xml — the result is the same timeline.
Still stuck? Write to us with the camera, the recorder and roughly how many clips — that is usually enough to reproduce it.